Falls Last Gasp In Connecticut

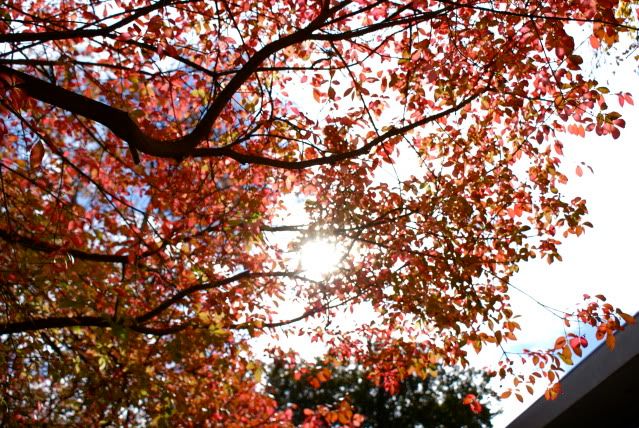
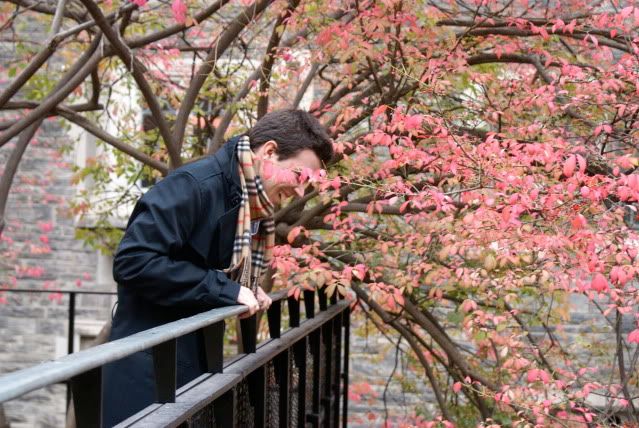
It just keeps going on and on.  Yesterday was another spectacular autumn day in Connecticut.  Same spots are just maintaining their leaves and giving a show that ranks right up there with some of the best leave peeping seasons in recent memory.  Today’s image was shot yesterday, just after the sun had gone down past the hill to the west.  It’s strictly lit by the afterglow of the gathering twilight.  It was shot as a part of a nine shot sequence with the idea of playing with Adobe Photoshop CS5’s HDR Pro.  Nine shots were done at .3 stop intervals, so it gave me everything from -1.3 to +1.3 off the camera’s metered exposure.  Kind of minimal brackets for attempting any HDR.  But, it does give me another option by doing it this way.  If one exposure is just too good to pass up, I end up with a great start point to develop a straight image.  That’s what we have today.  I could have expanded the range a bit by changing the bracket from .3 stops per click to .5 stops per click.  This option is available in the menus of a Nikon D300.  So, it is possible to shoot a nine shot sequence that goes two up and two down.  Today’s image has to be one of the straightest shots ever to appear on the gallery.  To find out just how straight, hot the “read more”.
Today’s image started out as a pretty typical RAW image. It looked flat. No sparkle, no intensity, just sort of blah. All RAW images begin life being rather uninteresting. The results of the shoot were imported into Adobe Photoshop Lightroom 3.3. One of the best reasons to use LR to import images is the ability to store each image in two locations. That gives you an automatic backup. The importance of that little trick was brought home in a big way just the other day. After a late afternoon shoot on Saturday the day’s swag was downloaded to the computer on two external hard drives. Monday I was going through the images and did a select all to code the image green. (My shots are coded green and Doris’ coded pink.) I saw one test shot, made while setting up to shot the moon, was a totally black frame. I’ve had enough of those, so I really didn’t need another. I thought I had clicked on it and right clicked to bring up the dialog box. I checked Delete Image and, from the submenu, Delete from Disk. The bad news was that I still had every image selected. Hit the okay button and everything was gone. That’ll take the wind out of your sails for a moment. The rescue was just re-importing the image from the second location. So much for a blood pressure spiking moment.


The adjustments to today’s image consisted of changing the White Balance to Shade and bumping up the Saturation using the HSL Panel in Lightroom. Using the targeted adjustment function button allows you to put the cursor on a specific color and increase all of its components at once. That was done to the red leaves and the green leaves. Bumped up the overall Vibrance and that was it. Only thing left to do was to put a subtle Vignette on it.

We’re going to a book publishing reception on Saturday for a book that a friend did some of the photography for. It’s a little north of Bethel. I expect, going ten miles to the north will result in what’s called “past peak” color. That means lots of bare branches and brown leaves. The color season in Connecticut is just about over. Time to do some indoor set up photography.

Sometimes The On Camera Flash Works

Everyone says your little popup flash on your camera is about the most useless piece of gear.  In general, when used at full tilt with it firing at the start of the exposure, “they” are typically right.  There are ways to improve the results of that ridiculous point source, on axis blast of light.  Today’s image is an example of what “could be” the result of a couple of simple adjustments done in camera and some new finishing techniques available in Adobe Photoshop CS5.  The pup with the intent look on his face was sitting in the front seat of a car in Litchfield Connecticut last Saturday.  The window was open and the day was a beautiful, warm (not hot) fall afternoon.  He had his head just above the sill of the window and appeared to be looked for his master.  We had been walking around town with a couple of friends, shooting general interest shots and waiting for the sun to go down and the moon to rise.  As it happened, the two conditions were just about in sync with each other.  Sunset was a couple of minutes before 6:00 PM and moonrise was about 6:03 PM.  We spotted this little guy being as patient as could be as we were killing some time.  To get an idea what the camera settings were and what the “new” finishing technique is, hit the “read more”.
Blasting away with the on camera flash is a recipe for disaster. “Normal” conditions would be TTL metering and front curtain sync. The settings for this shot were Slow Rear Curtain and a one stop reduction in the flash power. This, coupled with a -.3 general EV (Exposure Value), gave a very subtle pop of light. Rear Curtain sync fires the flash at the end of the exposure rather than at the beginning. This allows the ambient light to do the general illumination of the area and the flash freezes the subject. Reducing the flashes power level by one stop insures a very light touch of light rather than a blast of light. On a Nikon D300 the adjustment is made with a button just below the flash popup button and turning the settings wheel. This is a flash specific adjustment. It also works with shoe mounted speedlites. Adjusting the camera’s EV is a global adjustment. Therefore it affects both the camera’s setting and the speedlite’s setting. Very small pops of fill light can be produced using all the controls available on camera.


Dave Cross just did a class on Kelby Training about painting using a beta plugin available from http://labs.adobe.com called Pixel Bender. As it comes it has several options included in its galley. It also had a community being built up around it for people to add to the gallery selections adding many different effects. Dave’s class and today’s image use the Oil Painting selection. The first pass produced enough interest to keep on exploring what could be done.

The dog was sitting in such a manner as to show the passenger seat back, the gap between the seats and a portion of the driver’s seat. In the B&W conversion, that resulted in a grey, black, grey pattern that distracted from the image. The window and door showed just below his chin. The fix was to turn the entire background black and create today’s dramatic portrait of a small dog. What should have been a reference shot or just a fun capture has become a study. Let me know what you think. Thanks

bonjour!

I didn't realize that wearing a beret would cause so many remarks. I wear hats to school all the time, but I've never received such a response like when I wore my beret. Some were good, some bad, and some were simply "wow, you're so French", yet, I don't know whether people meant it in a good way or bad. Nonetheless, I positively adore this beret, and I do enjoy this touch of French to my wardrobe.


I'm wearing a vintage blazer/jacket and scarf, Marciano dress, unknown tights, Holt Renfrew beret, and Aldo shoes.

Make Things Easy With Adobe Photoshop CS5

Some things are a little tough to do in any photo editing application.  Some things just appear to be hard to do.  Today’s image is one of the later.  It starts out as two separate images and ends up as a composite.  It would be easy to add the moon to the image of the church in any of several different ways.  You could use the Erase Tool (E) [yuck].  You could make a Mask and Mask out the moon.  Readers can probably come up with another twelve methods of getting the image of the moon onto the main image.  The rub comes when you try to put the moon into the image “and” behind the branches of the tree.  I can’t imagine the Eraser Tool (E) being successful.  I could go along with using a mask, but you’d probably be stuck with the moon in one spot.  It you decided you wanted to move the moon you’d unlock the Mask from the image Layer and have limited ability to shift the moon.  There is a method that’s incredibly easy that’s overlooked (or unknown) by 99% of Photoshop users.  It’s not available in Adobe Photoshop Elements of any version.  If you’re interested in finding out about this little used secret weapon, hit the “read more”.
This deep dark secret is actually very easy to use. The first thing to do is to bring the image of the moon over onto the Layer structure of the image of the church. With the moon Layer above the church Layer and the moon Layer active, double click on the moon Layer’s panel. This brings up the Layer Style dialog box. Down at the bottom of the box is the Blend If options. You can see it has two slides. One is “This Layer” and the other is “Underlying Layer. To remove the black sky from the moon Layer, drag the “This Layer” slider to the right. It won’t take much to see a dramatic effect. You might see a slight black ring around the moon. If you do, split the tick marker by holding down the ALT key while moving one half of the tick. Move the right side a little further to the right. You’ll now have a clean image of the moon in the sky. If you stop here you’re image looks like you added a shot of the moon. Pretty blatant.


Now slide the “Underlying Layer” slider slightly to the right and you see the branches show through the moon. You may have to split the tick mark again to get the right amount of detail without blocking up the smaller twig like branches.


That’s it. Another way to make Photoshop work for you rather than making you do the heavy lifting.

This Weekend Is The Max For Autumn Color Around Here

The calendar says it, the weather forecasters proclaim it as though it was the first day, the nip is in the air and the photographers are ready.  Today’s image comes from last week’s ride to northwestern Connecticut and Kent Falls State Park.  Today’s image is of a single tree along the walk up to the base of the falls.  As I crossed the covered foot bridge and started up the path, this tree wasn’t even on the radar.  Half way to the falls it emerged out of the early morning mist.  I didn’t have a choice, I had to stop and shoot the tree before the gathering light ruined the mood.  I plunked down the tripod and shot a couple dozen frames.  In order to get the optimum exposure I bracketed the exposure at one stop steps, two stops in either direction of what the camera thought was correct.  This also gives me the potential to do some Adobe Photoshop CS5 HDR Pro magic if the spirit strikes me.  Today’s image is one exposure, but it did benefit from a slight bump from CS5’s HDR Toning.  The dark area surrounding the tree is actually the mountainside (a Connecticut level “mountain”, not a real mountain) behind.  A daylight shot, with the fog burned off, would have revealed the hillside with no problem.  As it was, the F Stop really didn’t matter.  F 22 wouldn’t have provided more detail in the background.  Everything was sucked up by the mist.  If you’d like to know the surprising details of the finishing of today’s image, hit the “read more”.
The one thing I didn’t want was to increase any blue tones in the shot. I’m always harping on saturating each of the colors (Red, Yellow, Green, Cyan, Blue, and Magenta) found in the Hue/Saturation Adjustment Layers. This time things went all over the scale. Red was increased slightly. Yellow: just a touch. Green was actually desaturated to bring down the grass in front of the tree. Cyan, Blue and Magenta weren’t even tried. A Vibrance Adjustment Layer was used to, again, bring up the colors in the middle ranges just a wee bit.


I wanted to take a look at what would happen would some HDR Toning (Image/Adjustments/HDR Toning). One more time, the sliders were barely nudged to get the desired effect. I did get to use an option for the first time going through this step. When I went to the HDR Toning, a dialog box popped up and said the file would have to be flattened to apply the HDR Toning. Since it was only a “look see” I wanted to preserve the Layers. I decided to Duplicate the file (Image/Duplicate) to have one with all the Layers and one to play with the HDR Toning. In the HDR Toning the Detail was brought up considerably and the Radius and Strength slide almost to zero. The reason for the high amount of Detail is that the Detail, Radius and Strength work hand in hand. Bringing the Radius and Strength down caused the Detail to need a big bump to show any effect.

Typical High Pass sharpening was applied and then a Vignette. The Vignette did absolutely nothing to the upper third of the image. I guess darkening white just makes more white.

ivy league

My lack of posting shall be excused due to mid-term season and extensive amounts of reading. Nonetheless, my best friend Chris and I found time to take photos around our university campus today. My university campus is sectioned off into various colleges (sort of like a home base), so we took pictures around my college, but hopefully next week I can find some time to venture to the other colleges and take photos there.

Autumn is my favourite season. I am a complete and utter lover of school, and autumn has always been the season that I associate with university life. The old rustic buildings, the ivy creeping along the stone walls, the crunchy leaves scattered across the grass; it's an incredibly poetic season.

I hope you all enjoy the photos. There are A LOT.


I'm wearing a Burberry trench coat, Baddley Mischka bag, Geox shoes, Guess blouse, Banana Republic cardigan, vintage skirt and scarf, Gap headband, gifted earrings, unknown tights.

Chris is wearing Aldo shoes, Burberry scarf, H&M trench coat, shirt and vest, and Gap jeans.